I suppose, given that we got a free day this year (Feb 29th), it might be considered a year since I last posted, but as it's not the 9th until tomorrow, I'm saying it's not quite. ;)
Anyway, yes, I've not been posting. As usually happens, work has been getting in the way (not that I'm complaining, I've shot some beautiful people over the last year and produced a good number of images I'm rather proud of).
I've been teaching some workshops too, and have also recently relaunched an old site under the new guise of learning photography, so I will generally be posting there from now on. I'll also be rewording and updating some of the stuff on here and shifting it over there in the form of new posts.
So, head on over to http://www.johnaldred.com/ and start following there instead. :)
Showing posts with label Nikon SB-900. Show all posts
Showing posts with label Nikon SB-900. Show all posts
Thursday, 8 March 2012
Sunday, 28 March 2010
Gellin' like Magellan
 I've had a number of people over the past few weeks ask me about gelling speedlight flashes, and how I do it. What gels do I carry around? How do I attach them to my speedlights? Are there any technical issues I need to think about? and so on.
Then today a thread was started on the Strobist Flickr group regarding the storage and organisation of gels and attaching them to the flash, so I was going to fire off a couple of pics. Well, I ended up shooting more than a couple, and decided to finally write a bit of a blog post about it.
I will use the terms "gel" and "filter" interchangeably throughout this post, but please note that when I say "filter", I'm talking about gels for your flashes, not those that you screw onto the end of your lens. :)
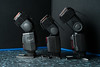
 So, to start with, I use Nikon SB-900, SB-600 and Yongnuo YN460-II flashes. The SB-900 comes with its own gel holder, and a small selection of common gels which work well if you happen to need exactly those gels, but sometimes you don't (although there is the Nikon SJ-3 filter kit available for the SB-900 to give you a little more variety).
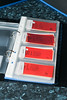
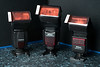
In the image above, you can see the three models of flashes mentioned, as well as my "gel folder". It's actually a business card holder, but it works perfectly. In the front of the folder is a pouch containing my four Lumiquest FXtra gel holders. Beyond that are pages of gels, ordered in different strengths, grouped according to colour.
On the first page of gels, you can see double CTO at the top, then full CTO, then 1/2 CTO and 1/4 CTO. The slip with information from the Rosco swatchbook is contained in the same pocket, and each gel has an address label attached to the end for quick and easy organisation when packing things away.
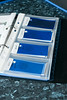
Above you can see a selection of CTO, CTB and Neutral Density filters that I pop over the flashes. Why neutral density filters? Well, sometimes, lowest power just isn't low enough, especially if you're working in close quarters with really tiny subjects.
To attach these gels to my flash, as mentioned, I use the Lumiquest FXtra gel holders. They can seem a little pricey, but I believe they are definitely worth it. It makes adding, removing or switching gels an absolute breeze, and using the cinch straps, there's no bits of velcro glued to your flashes and no sticky residue to deal with when they fall off.
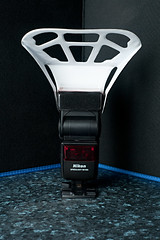
Here are the Nikon SB-600, SB-900 and Yongnuo YN460-II flashes with the Lumiquest FXtra gel holders attached. The image on the left shows the coverage over the front of the flash, and the image on the right shows the potential for light leakage on the sides.
As you can see, the FXtra's opening completely covers the flash head of both the SB-600 and the YN460-II when viewed from the front, which makes them idea for flashes with a head this size. It is a little tight on the SB-900, and the gel holder itself doesn't cover the full width of the flash, but not enough that it's ever bothered me. You can see on the image on the right, that the YN460-II gets the closest to the flash head for less leakage potential, although its head is fixed at 35mm, whereas the SB-600 and SB-900 can zoom their head for longer reach and less risk of spill.
Again, light spill out the sides from these has never really bothered me, and I can't really say it's affected my images, however thoes gaps at the side can easily be covered by a bit of black gaffer tape.
A couple of things to note when using it with an SB-900. Firstly, as mentioned, the FXtra doesn't cover the full width of the SB-900 flash head. This, in and of itself, is not a huge problem, as the gels are wide enough to cover the entire head. The other thing is that you've picked your gels out of a swatch book, they will have holes in them. You will need to either cover these up, or source gels that do not contain holes, such as those found in the strobist collection.
 There is another reason I chose to go with the FXtra gel holders, and that is as well as having velcro on the inside for attaching the holder to your flash, it also has velcro on the outside too, meaning you can attach further light modifiers. This makes it very handy if you need to use a flash on-camera with a gel, but still wish to use something like a Lumiquest 80/20 bouncer, a snoot, or a small honeycomb grid.
This light modifier allows 80% of your flash's output to continue straight on to bounce of a ceiling or a wall or whatever, while 20% of the light hits the bouncer and is directed at your subject in a slightly diffused manner. This essentially allows your flash to be its own key and fill light, although with varying degrees of success depending on your surroundings. It's not really all that cheap considering what it is, but it's something I wouldn't be without in my bag for those times when it's really needed.
So, that's a little more on the how, and what I use to attach flashes to my speedlights, and a bit of why I chose to go the particular route I went - essentially speed of use and the ability to add extra modifiers over the top of the FXtra.
I'll post a little more about why you would actually need to use gels (and why you might want to even when you don't need to) at some point in the future.
Monday, 22 March 2010
A couple of videos today
I've been quite slack in posting this month due to getting out a bit more and actually doing some shoots, then the inevitable post-processing that comes afterwards, so I do apologise for neglecting you all. I do, however, have all the models' choices processed from the Manchester shoot now, so I'll hopefully have enough time free to get those posted in the next couple of days.
I did make a little video the other day though demonstrating the use of a Nikon SB-600 as a repeating flash slave using the Nikon CLS system with a hotshoed SB-900 as the commander - somebody posted on a forum that this couldn't be done, so I had to prove them otherwise.
The whole repeating flash thing has me intrigued, so I'll be doing various test with SB-900, SB-600, Yongnuo YN460-II flashes, using the CLS system, standard optical slave modes and wireless triggers to see exactly what will and won't work, and the degree of reliability with each. I'll be doing a few experiments with different ideas and setups, so I'll post details on those as I get through them.
The other video I'm posting isn't one of mine. Zack Arias did a very inspirational and informational talk a few days ago at PhotoCamp Utah 2010, with a lot of GREAT tips and advice.
There are also plenty of other videos from the event on their Ustream channel, so head on over and have a watch.
Wednesday, 17 February 2010
It goes from bad to worse, then better again! :)
Had some new bits arrive this week. My free SB-900 arrived yesterday from Nikon. For those of you who didn't know, this was a special offer Nikon had for registered DSLR owners to upgrade to a D300s before mid-January and receive a free SB-900. So, I did, and now it's arrived to join the ranks in my growing little Speedlight army.
Just as an aside on the flash situation, I just recently discovered that the Yongnuo YN460-II actually has some limited CLS support (sort of). I always knew this flash had an optical slave mode (manual power, set from the flash itself, as usual), but what I didn't realise is that it has a second optical slave mode which is designed to ignore the pre-flashes sent by the CLS system. Very very handy if you just want to add a little light to a dark corner in your scene and you don't quite have enough SB-900s to go around. Just set your power (manually, from the flash itself, not via the CLS menus), pop on a gel, snoot, grid or whatever, and set it to CLS slave mode.
How close the colour temperature is to SB-900s (or even if their quality control provides for consistency between different samples of YN460-II flashes) I don't know, but at only £38 each, I think I'm going to have to pick a couple up and see how well they work.
Anyway, to go along with the new SB-900 and the RF-602 gear I received last week, I decided to pick up some Konig light stands. I had bought some on Amazon a couple of weeks ago, but they turned out not to be anything like Konigs with a non-standard adapter nobody I know has ever seen before (although the image in the listing did clearly show a standard 5/8" spigot). The company failed to acknowledge that the image misrepresented the item, but did refund the purchase cost minus the shipping (I had paid extra for next day), and my return shipping costs. So, all in all, I'm out about £20 because of those idiots.
A friend suggested an alternative seller on eBay from which he'd purchased some in the past, and they were top notch, so I ordered four. Konig, 2 metres tall (that's 6'6" for the rest of us), each with their own individiual bag. Very pleased. I hadn't tried them before, but I needed something a bit more lightweight than I usually cart around.
They'll definitely require some assistance to help prevent them from falling over in anything more than a breeze, and I probably wouldn't want to throw a 43" brolly on one outdoors, but they're not bad at all for the price and will definitely see much use now that the weather's starting to warm up. Given that I got these to help become more "lightweight", I'm currently seeking alternatives to sandbags. That kind of defeats the purpose of lighter stands, but we'll see. :)
Speaking of the weather warming up, and getting over spending far too long in bed doing nothing, I'll hopefully be able to get back out and shooting more regularly again soon. So, I'll be popping up some reviews of the new gadgets I've picked up over the past few weeks, giving them a good workout and testing, along with some tips and tricks to workaround any problems that may come up when using them.
Sunday, 24 January 2010
Photo 52 Week 3, "Chopped"
 You can see the image I posted for this week's Talk Photography Photo 52 by clicking on the image to the right, but I wanted to post a little extra about it here on my regular blog, mention how I messed up, and how I could've fixed it had I enough time.
The theme this week was "Chopped", which sent quite a few ideas through my mind, most of which required a decent amount of effort to try to avoid the obvious, but I had settled on one specific image in my head. This wasn't it. :)
My own kitchen is currently a construction site, so I decided to head over to my mother's house to take the shot. The other reason was that I knew (or thought) she had some props there that I had in mind for the original image I wanted to make. As it turned out, she didn't. So, I had to come up with something else and shoot it in about 10 minutes, as she was rushing me to get out of the house as she had to leave (and I'd lose my assistant holding the light too).
So, this is what I came up with. I do like the composition and layout of it, for the most part, but the lighting definitely needs some work. This is primarily where I screwed up.
I wanted to use a traditional wooden handled axe, but after trips to four or five different local hardware stores I couldn't find a single one that was about the size I needed. The only wooden handled ones I saw were absolutely massive, and far too big for my mother's kitchen counter (which, as you can see from the image, just wasn't quite deep enough for what I was going for as it was).
The scene was light by just a single SB-900 from above camera right, shot through a 33" TriGrip diffuser. If I'd had the time, I would've added a second snooted or gridded SB-900 above at the far side of the axe (flagged off from the camera to help prevent flares) pointed at the axe head in order to give it some reflection and show off a bit more of its curved shape and definition.
I might also have possibly put another snooted SB-900 camera left on the countertop throwing a very small amount of light on the back face of the axe head to help separate it a bit from the dark shadow of the countertop.
I do have a couple of other ideas for the "Chopped" theme, but there just wasn't enough time to shoot them when I did this (like I said, I didn't even have enough time to get this one right), so this is a subject I want to go back to in the future to try those out, as well as revisit this particular shot and fix the lighting.
You can follow the progress of my Photo 52 over on my Photo 52 Blog.
Friday, 22 January 2010
What's in the bag? - My Strobist Kit
Short of taking everything, which kind of defeats the purpose of traveling light and using small strobes, there's no way that I would be able to put together a one-size-fits-all set of gear. Sometimes I may only need a single SB-900, other times I may need a dozen. I might only need a single lens for the whole shoot or I may require 2 or 3. I may or may not require softboxes, light stands, background stands & backdrop, snoots, grids, gels & holders, flash brackets, clamps, laptop & USB hard drives for tethered shooting, or any one of a hundred other things.
That is not to say that I don't always have a bag prepared and ready to go should the urgent need arise, and that's where this post comes in.
I have a few different bags that I use, but the one I carry most often is my Tamrac Cyberpack 6. I bought this bag about 5 years ago and love it. It's got plenty of space in there, and feels fairly solid on my shoulders when carrying it around. Fully laden it can get very heavy, so I tend not to fill it whenever possible, especially if walking long distances during the course of a location shoot. It has a laptop pouch in the back of it that I rarely fill unless absolutely required for this reason.
But, to get to the list. I find this generally covers many initial scouting requirements and will also suffice for quite a bit of basic shooting, enough to keep the clients happy.
Note : Some of the items in the list link to Nikon USA as they don't seem to appear on the Nikon UK website for some reason.
- The Bag Itself
- Tamrac Cyberpack 6 Photo Laptop Backpack
- Cameras, Lenses & Associated Equipment
- Nikon D200 + MB-D200 Grip with Nikon 50mm f/1.8D attached
- Nikon D300s + MB-D10 Grip (no lens attached)
- Nikon 300mm f/4 AF-S
- Sigma 10-20mm f/4-5.6 EX DC HSM
- 6x Nikon EN-EL3e Batteries (2 inside each body and 2 spare)
- 4x 4Gb Extreme III 30Mb/sec CompactFlash Cards (for the D200)
- 2x 8Gb Extreme 60Mb/sec CompactFlash Cards (for the D300s)
- 1x 16Gb Integral SDHC Card (for recording HD Video on the D300s)
- Lights
- 1x Nikon SB-600 Flash
- 2x Nikon SB-900 Flashes
- 16x GP2700 AA NiMH 2600mAh Rechargeable Battieres (4 for each flash and 4 spare)
- Light Modifiers
- Lumiquest 80-20 Bouncer
- Lumiquest Mini Softbox
- Lumiquest Softscreen (built-in flash diffuser)
- 2x Lumiquest FXtra Speedlight gel holders
- Assorted Rosco gels, cut to swatchbook size for using in the FXtras
- FalconEyes "Flash Gun Bounce Kit Set" (snoot, 2x grids, and a flag/reflector)
- Other Bits & Pieces
- Manfrotto 3001BN tripod & 3030 3-way Head (Bought this a few years ago when they still marketed as Bogen) - I'm usually hand-held with flash, so I don't need anything overly heavy or stable; it's just to rest the camera on. When I am shooting from a tripod at a client's location, it's usually indoors with the Sigma 10-20mm and MC-20 remote so no wind or shake to contend with really anyway.
- Hotshoe bubble level (Not really needed any more on the D300s, but still used on the D200)
- Various Hoya & B+W UV & Polarising Filters
- Nikon MC-20 10-Pin Remote Control
- Nikon MC-21 10-Pin Extension Cable
- A couple of Lastolite Tri-Grip reflectors & diffusers
- A couple of Microfibre Lens Cleaning Cloths
- A stack of business cards
This setup doesn't really account for any umbrellas, light stands, softboxes or environmental portraits, but it does the job nicely. If I'm going straight to a business location, such as an office, with all the equipment and doing all the shooting there, I will usually pop the laptop into the back of the backpack so I can shoot tethered. Then I'll either take along a second bag containing light stands, flash brackets, umbrellas, reflectors, a couple of big white bedsheets to act as large diffusers, etc. or I'll just repack a single bag to suit the job.
So, there you have it. That covers most of my arsenal of strobist lighting gear and other gadgets & doohickies.
Monday, 4 January 2010
Welcome to Kao's photo blog
 So, I decided to setup a blog for this year's Talk Photography Photo52. Despite being very experienced on computers and the web, having been on the development teams of a couple of fairly large opensource PHP based projects and written many specific scripts and web-based applications for clients, I've never actually written on a blog before this. So I thought it was quite the leap for me.
Now that I've had a bit of a play around with it, I thought it'd be a good idea to setup a blog for other photo related topics that come up in the course of my daily life. Some days there are none, and some days there can be quite a few. Hopefully there will be enough that I can post to this blog regularly.
I'm going kick things off with the lovely Christmas present I received from my wife this time around. Thanks to Nikon's free SB-900 offer on the purchase of a D300s (see the pic at the top right), she went ahead and got me one for Christmas. It's been a couple of weeks now that I've had it and I have to say, it's a very sexy piece of kit.
I've not had that much of a play with it yet, but more than likely all of the photos for the Photo52 will be shot with it. Just for your info, the shot of the D300s and 70-200mm f/2.8 VR lens was shot with the Nikon D200 and 50mm f/1.8D lens. Lit using an SB-900 placed directly overhead in a 24" softbox, with another snooted SB-900 pointing into the business end of the lens to try to light things up a little inside there and stop it looking like a big black hole in the image. Just a quicky shot in the living room, so nothing special.
More soon.
Subscribe to:
Posts (Atom)


