 I've had a number of people over the past few weeks ask me about gelling speedlight flashes, and how I do it. What gels do I carry around? How do I attach them to my speedlights? Are there any technical issues I need to think about? and so on.
Then today a thread was started on the Strobist Flickr group regarding the storage and organisation of gels and attaching them to the flash, so I was going to fire off a couple of pics. Well, I ended up shooting more than a couple, and decided to finally write a bit of a blog post about it.
I will use the terms "gel" and "filter" interchangeably throughout this post, but please note that when I say "filter", I'm talking about gels for your flashes, not those that you screw onto the end of your lens. :)
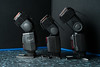
 So, to start with, I use Nikon SB-900, SB-600 and Yongnuo YN460-II flashes. The SB-900 comes with its own gel holder, and a small selection of common gels which work well if you happen to need exactly those gels, but sometimes you don't (although there is the Nikon SJ-3 filter kit available for the SB-900 to give you a little more variety).
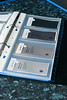
In the image above, you can see the three models of flashes mentioned, as well as my "gel folder". It's actually a business card holder, but it works perfectly. In the front of the folder is a pouch containing my four Lumiquest FXtra gel holders. Beyond that are pages of gels, ordered in different strengths, grouped according to colour.
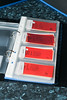
On the first page of gels, you can see double CTO at the top, then full CTO, then 1/2 CTO and 1/4 CTO. The slip with information from the Rosco swatchbook is contained in the same pocket, and each gel has an address label attached to the end for quick and easy organisation when packing things away.
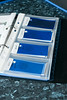
Above you can see a selection of CTO, CTB and Neutral Density filters that I pop over the flashes. Why neutral density filters? Well, sometimes, lowest power just isn't low enough, especially if you're working in close quarters with really tiny subjects.
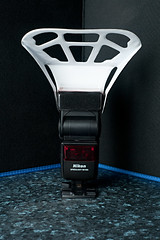
To attach these gels to my flash, as mentioned, I use the Lumiquest FXtra gel holders. They can seem a little pricey, but I believe they are definitely worth it. It makes adding, removing or switching gels an absolute breeze, and using the cinch straps, there's no bits of velcro glued to your flashes and no sticky residue to deal with when they fall off.
Here are the Nikon SB-600, SB-900 and Yongnuo YN460-II flashes with the Lumiquest FXtra gel holders attached. The image on the left shows the coverage over the front of the flash, and the image on the right shows the potential for light leakage on the sides.
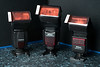
As you can see, the FXtra's opening completely covers the flash head of both the SB-600 and the YN460-II when viewed from the front, which makes them idea for flashes with a head this size. It is a little tight on the SB-900, and the gel holder itself doesn't cover the full width of the flash, but not enough that it's ever bothered me. You can see on the image on the right, that the YN460-II gets the closest to the flash head for less leakage potential, although its head is fixed at 35mm, whereas the SB-600 and SB-900 can zoom their head for longer reach and less risk of spill.
Again, light spill out the sides from these has never really bothered me, and I can't really say it's affected my images, however thoes gaps at the side can easily be covered by a bit of black gaffer tape.
A couple of things to note when using it with an SB-900. Firstly, as mentioned, the FXtra doesn't cover the full width of the SB-900 flash head. This, in and of itself, is not a huge problem, as the gels are wide enough to cover the entire head. The other thing is that you've picked your gels out of a swatch book, they will have holes in them. You will need to either cover these up, or source gels that do not contain holes, such as those found in the strobist collection.
 There is another reason I chose to go with the FXtra gel holders, and that is as well as having velcro on the inside for attaching the holder to your flash, it also has velcro on the outside too, meaning you can attach further light modifiers. This makes it very handy if you need to use a flash on-camera with a gel, but still wish to use something like a Lumiquest 80/20 bouncer, a snoot, or a small honeycomb grid.
This light modifier allows 80% of your flash's output to continue straight on to bounce of a ceiling or a wall or whatever, while 20% of the light hits the bouncer and is directed at your subject in a slightly diffused manner. This essentially allows your flash to be its own key and fill light, although with varying degrees of success depending on your surroundings. It's not really all that cheap considering what it is, but it's something I wouldn't be without in my bag for those times when it's really needed.
So, that's a little more on the how, and what I use to attach flashes to my speedlights, and a bit of why I chose to go the particular route I went - essentially speed of use and the ability to add extra modifiers over the top of the FXtra.
I'll post a little more about why you would actually need to use gels (and why you might want to even when you don't need to) at some point in the future.


No comments:
Post a Comment