I really must apologise for my absence of late. I started off this blog with all good intentions of posting regularly, at least a couple of times a week, but that pesky "real life" stuff always seems to change the order of my priorities when I least expect it.
Last week or so I've spent down in Suffolk working with some great people (Steve Cheshire, MrsC, MegaanC, JaneB and Paul Minus). The whole week was fantastic with some incredible locations to shoot. Hopefully I'll have enough time to get those ones processed relatively soon and post some up for you (Yes, I know, I still need to get the Manchester and Liverpool group shoot images up. This week, I promise!).
Tomorrow is a day I'm very much looking forward to. I get to shoot one of my childhood heroes; Dirk Benedict. Yes, that's right, Templeton "Faceman" Peck, Liuetenant Starbuck, and now starring as the scruffy, bumbling Lieutenant Columbo in the stage production "Columbo: Prescription Murder" currently touring its way across the UK.
Speaking of scruffy, bumbling types; I don't talk politics in public, but I just watched Boris Johnson's interview on BBC News 24. This guy really needs to get a stand up comedy act together. :)
Anyway, I need to switch out the next set of batteries into the charger for tomorrow's shoot, and I probably should start going through last week's images and begin the elimination process.
Friday, 7 May 2010
Friday, 23 April 2010
Follow Friday (23/4/10)
 I've decided to do something a little differently for Twitter's Follow Friday (#ff) from now on. I lose track of the people I've tweeted before, and what everybody I'm following does.
So, from now on, each week, as I see interesting tweets from people and groups I'm following, I'll be updating a draft post on my blod. This post will be published each Friday, listing the most interesting people & tweets I saw that week, then I will post a link to that blog post on my Twitter feed.
- PetaPixel - Now, these guys post a lot of cool stuff, but this was a neat one. Stabilising your camera with some PVC Pipe (wonder how much it might help with hand-held camera shake from HD-DSLRs).
- Nino Leitner - An award winning film maker from Vienna, Austria had a rather interesting blog post this week regarding HD-DSLRs, where they're being used, and some of the technicalities of it all.
- Chase Jarvis - Now, everybody knows Chase, but he posted something extremely cool this week. How to use your iPhone as a wireless camera for your iPad! Now those Fanboys who have both need no longer complain about the iPad's lack of a camera.
- Sunny Lau - Director, designer and photographer. Sunny ran across this amusing video on Youtube this week regarding Steve Jobs' response to the iPhone 4 "leak" on Gizmodo.
- Ace - A good friend of mine, a photographer from down south (although we won't hold that against him!)
- Christiancable - A fellow photographer from the Lancaster Photographic Society
- Mary J Lockwood - A storyteller/writer/comedienne from Lancaster, although now residing in London.
Except for this, as it's not on Twitter, but definitely worth a good read!
- Carl Spring - If you're good at something, never do it for free! (even if you're an amateur!)
Saturday, 17 April 2010
Blackpool Zoo with Talk Photography
 So, button-moon (AKA Tracey) over at Talk Photography decided to organise a meet up at Blackpool Zoo last weekend. The wife and I decided to go along (she'll go to the zoo at the drop of a hat) and take a few pics of the critters darted about their various homes within.
There was about 30 of us that met up, and it was a great day. The weather was fantastic, and the other folks from the forum were a great bunch of people.
I hadn't had a chance to go through all of my pics from the day yet, although I did shoot quite a few, pretty much all of them with the D300s and the 70-200mm f/2.8VR, although I did break out the Sigma 10-20mm for a few of the ring tailed lemurs and the pelicans. I even got told I was cheating when I pulled out an SB-900 in the reptile house (it was worth it though after seeing the results). :)
So, here's a few of my images from the day...
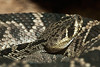

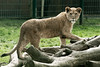


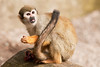
As I gradually get time to go through them, I'll be getting more online, and you'll be able to keep updated on the Blackpool Zoo set on my Flickr pool.
Friday, 9 April 2010
The Voigt has Länded
 Ok, so the title is an absolutely terrible pun, but I wanted to let you guys know that my 1932 Voigtländer Brilliant arrived yesterday. I haven't had much time to play with it yet, but after building a basic contraption, I did get a quick shot last night.
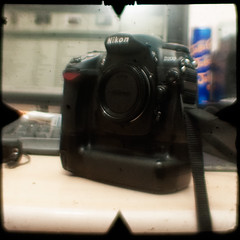
So here is my first TTV picture. Nothing fancy at all. It's my D200 (complete with Jaffa Cakes in the background), shot with my D300s via the Voigtländer Brilliant.
Now, I did cheat a little bit with the lighting. We have energy saving light bulbs in our living room, and even going down manually to 2500K, it was still a little bit warm. So, I fired up an SB-900 and bounced it off the ceiling. :)
I thought my Kodak Brownie Reflex had arrived a couple of days ago too, but on opening up the box, I discovered that the seller had accidentally sent me the wrong camera. So I taped it back up, returned it and they're going to refund my return shipping costs and send me out the right one (so nice to see sellers on eBay that will do the right thing and fix a situation quickly).
So, the Brownie Reflex and Duaflex II cameras are still on their way. I'll probably hold off on experimenting further with TTV until all three are safely in my hands, and I can have a good play with all of them, but I'll be sure to keep you guys updated, and inundated with terrible photos, until I figure out what I'm doing. :)
Tuesday, 6 April 2010
Enabling Colour Profiles in Firefox
Anyway, after going to the Focus on Imaging show last month, and picking up several 100-sheet packs of Ilford Galerie Smooth Pearl and Harman Crystaljet Luster paper I decided it was about time I got a bit more serious about my calibration (and I really wanted something that would allow me to calibrate a multiple monitor system without all the farting around).
So, I went ahead and I bought the X-Rite Eye One Display 2, and how sexy it is. I bought it from a company called Native Digital, on the recommendation of a friend who had used them in the past. When you buy the Display 2 from them, they also throw in two free printer profiles (normally £15 each), so as I'd just got new papers for the printer, it sounded like a great deal to me.
Unit arrives, bit of screwing around to figure out how the software works, and I have two beautifully calibrated virtually identical screens sitting on my desk. I save an image out of Photoshop, using the sRGB colour profile via "Save for Web and Devices", upload it to Flickr and... hold on a minute... why does it look different to the image in Photoshop?
So I did a little digging, because I could've sworn I read that FireFox 3 supported embedded colour profiles within images. Turns out, it does, although it's not enabled by default, which means that everything is being shown with your standard calibration, and not necessarily how the photographer intended it to be viewed.
After a little more digging around, I discovered that there are a couple of plugins that claim to enable this feature for you, as there is nothing in FireFox's "Options" dialogue, nor any of the menu options. The plugins didn't seem to do a thing for me, so I deleted them, and I can't really tell you what they were, you'll have to hit up Google if you're curious. Eventually I did manage to find a solution (which is a lot less hassle than downloading and installing a plugin to be honest with you), which I'm going to pass along right here.
WARNING : You can seriously screw up your FireFox configuration if you change something in here you're not supposed to change, so I take no responsibility for anything YOU do with YOUR computer. :)
That said, this is what I did, what worked for me, so here it is.
When facing the Firefox browser window, you want to enter "about:config" into the URL bar. You will be then confronted with a warning as shown in the image below (remember, I told you, not my fault if you screw something up. If you're not sure what you're doing, don't do this!).

Clicking the button to continue into the configuration presents you with hundreds and hundreds of ways to screw up your settings...

So, let's narrow things down a bit. You'll want to start by entering "gfx" into the "Filter" box shown at the top of the page, and the option we're going to be editing is highlited in the screenshot below.

Simply double click on this line to bring up the dialog box. When the box comes up, enter a value of "1", and click OK.

Now, your list should look lke this. The "Status" till change from "default" to "user set" to show that the default value has been edited by the user. If you do screw something up, this could help you to find those settings you changed and assist you in resetting them.

Now just restart FireFox (although, I'm not even certain this step is required) and you're all set. Your images with embedded sRGB colour profiles (as the vast majority of photos on the web are) will be displaying their correct colours on your beautifully calibrated screen.
Wednesday, 31 March 2010
Could this be considered regressing?
 So, I've been keeping an eye on some of the "Through the Viewfinder" (TTV) groups recently over on Flickr (like this one, and this one), and I thought "that looks neat, I'll have to give it a go sometime".
While hunting around for a suitable camera to use, I've been astonished at the prices some of these old cameras are still fetching over on eBay in the UK, averaging anywhere from £100-200 a piece. Most of the American TTVers I've seen rave about the excellence of the Argus 75 (aka Argoflex 75) for this use, which seem to sell for a mere £10-20, although with about a £60 shipping cost to the UK as they only seem to be for sale in the US.
Still a little more than I want to pay for an experiment and a little bit of fun. Whilst browsing the auctions last night I ran across a Kodak Brownie Reflex like in the image at the top of this post (which isn't mine, it belongs to Purple Monkey Dish Washer and is used here in accordance with the CC license - he's got a few cracking shots if you dig through his photostream, you should head on over and take a look. Thank you Roy!) for only a tenner; just under £13 with shipping included, bargain!
Anyway, the example I bought isn't quite as pristine as Roy's on the exterior, although it should suit my needs just fine. I will have to build a "contraption" (yes, that's the technical term) in order to be able to shoot from my D300s through the Brownie's viewfinder, but I have an idea of how I'm going to be putting it all together (which I'm sure will fail in no time at all).
Once it arrives, I might see if I can get a couple of rolls of film to put through it before I start to wrap it with foamcore and gaffer tape; If I don't get too impatient and just start at it right way that is. :)
Edit : on a completely unrelated topic, this is brilliant. Translated by a DJ at Radio 1, this had me laughing the whole way through (thanks Lenz!)
Edit 2 : Back to the original topic, also just got a Voigtlander Brilliance for an absolute steal, so I'll have a couple of cameras to experiment with now. Also picked up some extension tubes to be able to make a shorter contraption using my Nikon 50mm f/1.8D lens.
Edit 3 : Ok, so I have a Kodak Duaflex II coming as well. I wish Royal Mail would get off their backsides, get back to work and deliver my packages to me. Anybody would think it was a holiday or something. ;)
Sunday, 28 March 2010
Gellin' like Magellan
 I've had a number of people over the past few weeks ask me about gelling speedlight flashes, and how I do it. What gels do I carry around? How do I attach them to my speedlights? Are there any technical issues I need to think about? and so on.
Then today a thread was started on the Strobist Flickr group regarding the storage and organisation of gels and attaching them to the flash, so I was going to fire off a couple of pics. Well, I ended up shooting more than a couple, and decided to finally write a bit of a blog post about it.
I will use the terms "gel" and "filter" interchangeably throughout this post, but please note that when I say "filter", I'm talking about gels for your flashes, not those that you screw onto the end of your lens. :)
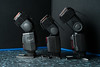
 So, to start with, I use Nikon SB-900, SB-600 and Yongnuo YN460-II flashes. The SB-900 comes with its own gel holder, and a small selection of common gels which work well if you happen to need exactly those gels, but sometimes you don't (although there is the Nikon SJ-3 filter kit available for the SB-900 to give you a little more variety).
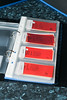
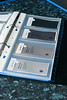
In the image above, you can see the three models of flashes mentioned, as well as my "gel folder". It's actually a business card holder, but it works perfectly. In the front of the folder is a pouch containing my four Lumiquest FXtra gel holders. Beyond that are pages of gels, ordered in different strengths, grouped according to colour.
On the first page of gels, you can see double CTO at the top, then full CTO, then 1/2 CTO and 1/4 CTO. The slip with information from the Rosco swatchbook is contained in the same pocket, and each gel has an address label attached to the end for quick and easy organisation when packing things away.
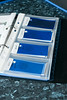
Above you can see a selection of CTO, CTB and Neutral Density filters that I pop over the flashes. Why neutral density filters? Well, sometimes, lowest power just isn't low enough, especially if you're working in close quarters with really tiny subjects.
To attach these gels to my flash, as mentioned, I use the Lumiquest FXtra gel holders. They can seem a little pricey, but I believe they are definitely worth it. It makes adding, removing or switching gels an absolute breeze, and using the cinch straps, there's no bits of velcro glued to your flashes and no sticky residue to deal with when they fall off.
Here are the Nikon SB-600, SB-900 and Yongnuo YN460-II flashes with the Lumiquest FXtra gel holders attached. The image on the left shows the coverage over the front of the flash, and the image on the right shows the potential for light leakage on the sides.
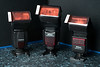
As you can see, the FXtra's opening completely covers the flash head of both the SB-600 and the YN460-II when viewed from the front, which makes them idea for flashes with a head this size. It is a little tight on the SB-900, and the gel holder itself doesn't cover the full width of the flash, but not enough that it's ever bothered me. You can see on the image on the right, that the YN460-II gets the closest to the flash head for less leakage potential, although its head is fixed at 35mm, whereas the SB-600 and SB-900 can zoom their head for longer reach and less risk of spill.
Again, light spill out the sides from these has never really bothered me, and I can't really say it's affected my images, however thoes gaps at the side can easily be covered by a bit of black gaffer tape.
A couple of things to note when using it with an SB-900. Firstly, as mentioned, the FXtra doesn't cover the full width of the SB-900 flash head. This, in and of itself, is not a huge problem, as the gels are wide enough to cover the entire head. The other thing is that you've picked your gels out of a swatch book, they will have holes in them. You will need to either cover these up, or source gels that do not contain holes, such as those found in the strobist collection.
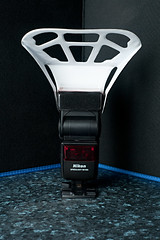 There is another reason I chose to go with the FXtra gel holders, and that is as well as having velcro on the inside for attaching the holder to your flash, it also has velcro on the outside too, meaning you can attach further light modifiers. This makes it very handy if you need to use a flash on-camera with a gel, but still wish to use something like a Lumiquest 80/20 bouncer, a snoot, or a small honeycomb grid.
This light modifier allows 80% of your flash's output to continue straight on to bounce of a ceiling or a wall or whatever, while 20% of the light hits the bouncer and is directed at your subject in a slightly diffused manner. This essentially allows your flash to be its own key and fill light, although with varying degrees of success depending on your surroundings. It's not really all that cheap considering what it is, but it's something I wouldn't be without in my bag for those times when it's really needed.
So, that's a little more on the how, and what I use to attach flashes to my speedlights, and a bit of why I chose to go the particular route I went - essentially speed of use and the ability to add extra modifiers over the top of the FXtra.
I'll post a little more about why you would actually need to use gels (and why you might want to even when you don't need to) at some point in the future.
Subscribe to:
Posts (Atom)


